KDP Coloring Book Specs: Complete Guide for Beginners
KDP Coloring Book Specs: Complete Guide for Beginners
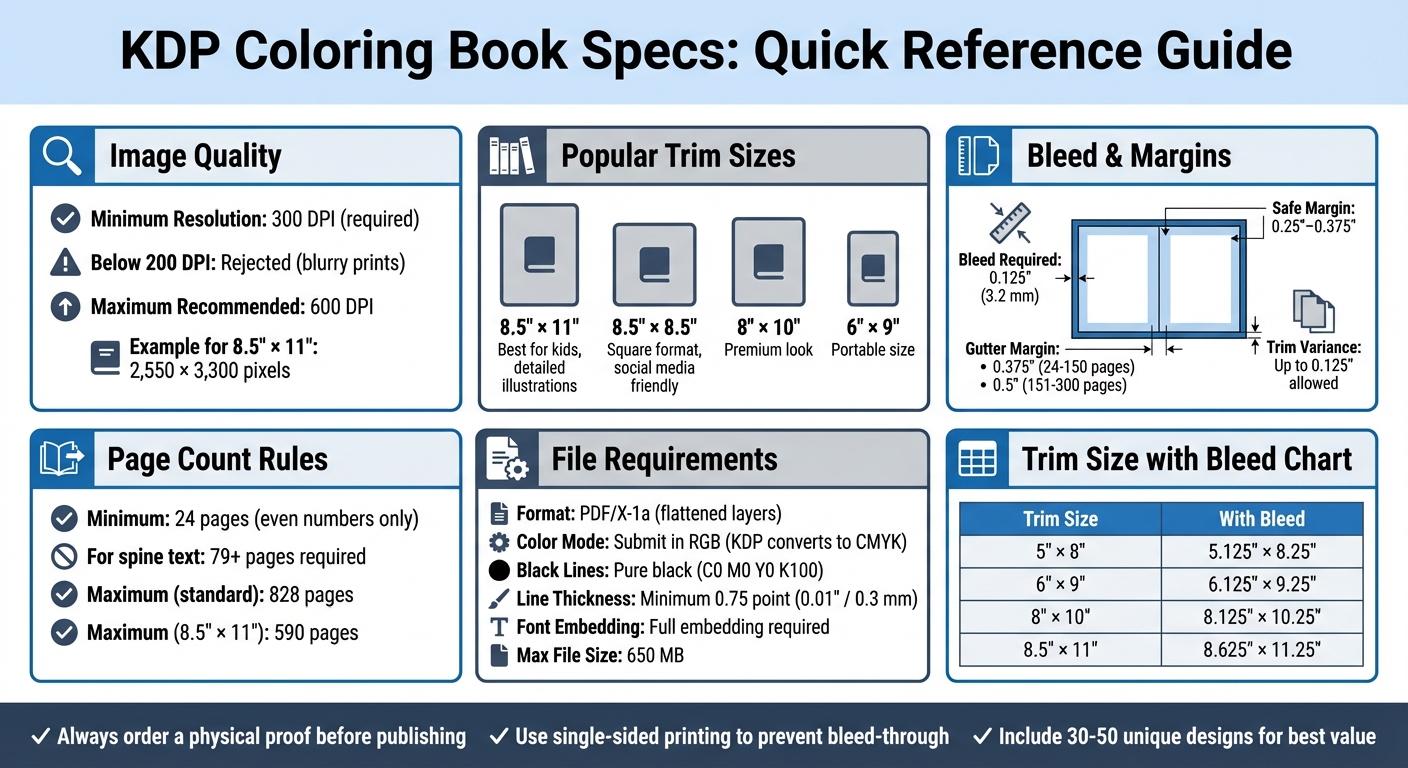
Want to publish a coloring book on KDP? Here’s what you need to know to get it right the first time. Amazon KDP has specific technical requirements for coloring books, from image resolution to page formatting. Missing these standards can cause delays or rejection. This guide covers everything you need to know, including:
- Image Quality: Use 300 DPI resolution for sharp prints. Low-resolution images (below 200 DPI) will appear blurry.
- Trim Sizes: Popular options include 8.5" × 11" for kids or 8.5" × 8.5" for adults. Add a 0.125" bleed for edge-to-edge designs.
- Margins and Bleed: Keep key content 0.25"–0.375" from edges. Include a bleed to prevent white borders.
- Page Count: Minimum of 24 pages; even numbers only. For spine text, your book must have 79+ pages.
- File Format: Submit a PDF/X-1a file with flattened layers and embedded fonts. Max file size: 650MB.
- Single-Sided Printing: Best for coloring books to prevent marker bleed-through.
Pro Tip: Always order a physical proof to check for alignment, print quality, and any errors before publishing.
Keep reading for detailed steps on file preparation, layout design, and KDP’s upload process.
KDP Coloring Book Technical Requirements Quick Reference Guide
Trim Sizes and Dimensions for KDP Coloring Books
Common Trim Sizes and When to Use Them
When creating a coloring book for KDP, the trim size you choose plays a big role in how your book is perceived. For example, 8.5" × 11" offers plenty of space for designs, making it ideal for detailed illustrations or children's books. If you're focusing on mandalas or artwork that resonates with social media trends, 8.5" × 8.5" square dimensions work well. For a more premium and polished look, 8" × 10" is a great option, while 6" × 9" is perfect for portability. Keep in mind that larger sizes tend to increase printing costs.
For younger audiences, larger formats like 8.5" × 11" are easier to handle and more engaging. Meanwhile, adults might lean toward square formats for their sleek and modern appeal. Be sure to check KDP's guidelines for approved trim sizes before finalizing your design.
KDP's Allowed Trim Size Range
KDP has specific requirements for trim sizes to ensure compatibility with their printing process. The trim width must fall between 4" and 8.5" (101.6–215.9 mm), and the trim height should be between 6" and 11.69" (152.4–296.92 mm). Books that exceed 6.12" in width or 9" in height are classified as "large trim sizes", which can impact production costs.
Additionally, paperbacks must meet a minimum of 24 pages, and the maximum page count depends on the type of paper and ink you select - up to 830 pages in some cases. Once you've selected a trim size, ensure you stick to the correct aspect ratio to avoid any distortion or cropping issues.
Aspect Ratios and How They Affect Design
Getting the aspect ratio right from the beginning is crucial for maintaining the integrity of your artwork. Incorrect ratios can lead to stretched or cropped designs during printing. If you're working with low-resolution images, consider redrawing them to keep the lines sharp and clean.
To avoid any issues, set your page size in your design software before starting your illustrations. This step locks in the correct aspect ratio and ensures that your final product looks professional and polished. Proper planning here saves time and prevents costly mistakes later on.
Image Resolution and Print Quality Standards
DPI Requirements for Coloring Book Images
Amazon KDP mandates that all images, whether for the interior or the cover, must have a resolution of at least 300 DPI. Images falling below 200 DPI are flagged as low resolution, leading to blurry or pixelated prints.
"Images that contain 300 DPI produce the best print quality. As the DPI increases, so does the resolution and print quality, showing more detail in the image." - Amazon KDP
To check if an image meets the required DPI, divide its pixel dimensions by the print size in inches. For instance, an image with dimensions of 2,550 × 3,300 pixels, printed at 8.5″ × 11″, achieves exactly 300 DPI. So, for an 8.5″ × 11″ page, your images should measure at least 2,550 × 3,300 pixels. While there’s no strict upper limit, Amazon suggests keeping images below 600 DPI to avoid file size issues or processing delays.
It’s important to note that simply changing the DPI setting on a low-resolution image won’t improve its quality. A file that starts at 72 DPI will remain blurry, even if adjusted to 300 DPI. This highlights the importance of starting with high-quality images that meet the resolution standard from the outset.
How to Create or Source High-Resolution Images
High-resolution images are essential for maintaining the sharpness of illustrations in print. If you’re working with AI-generated images, you’ll often need to upscale them. For example, tools like Midjourney typically produce images at 1,024 × 1,024 pixels, which translates to about 85 DPI when printed at a 12-inch width. To meet print-quality standards, you’ll need to use specialized upscaling tools rather than relying on basic resizing.
Here are some effective tools for upscaling:
- Topaz Gigapixel AI: A professional-grade tool offering up to 6× upscaling, available as a one-time purchase for $99.
- Upscayl: A free, open-source alternative that provides 4× upscaling, ideal for creators on a budget.
- Magnific AI: Perfect for extreme upscaling needs, this tool can enhance images up to 16×, with plans ranging from $39 to $99 per month.
When preparing your manuscript in Microsoft Word, take steps to preserve image quality. Go to File > Options > Advanced and enable the setting labeled "Do not compress images in file." Always insert images at their original size to avoid resolution loss. Lastly, save your manuscript as a PDF/X-1a, the format preferred by KDP for high-quality printing.
Bleed, Margins, and Full-Bleed Illustrations
What Bleed Is and Why It Matters
In printing, "bleed" refers to when images, backgrounds, or illustrations stretch beyond the trim line - the area where the book will be cut during manufacturing. For books printed through KDP, 0.125" (3.2 mm) is trimmed off the top, bottom, and outside edges of each page. Without bleed, you risk having an unwanted white border appear along the page edges, disrupting the clean, professional look of edge-to-edge designs.
If even one page in your coloring book needs bleed, the entire manuscript must be formatted with bleed settings and uploaded as a PDF. To determine the correct page size with bleed, you’ll need to add 0.125" to the trim width and 0.25" to the trim height (0.125" for both the top and bottom). For instance, an 8.5" × 11" trim size becomes 8.625" × 11.25" when bleed is included.
| Trim Size | Page Size with Bleed (Width × Height) |
|---|---|
| 5" × 8" | 5.125" × 8.25" |
| 6" × 9" | 6.125" × 9.25" |
| 8" × 10" | 8.125" × 10.25" |
| 8.5" × 11" | 8.625" × 11.25" |
Setting Safe Margins for Important Content
To avoid accidentally cutting off important elements, such as text or key illustrations, position them at least 0.25" to 0.375" away from the trim edge. For the gutter - the inner margin near the book's spine - use 0.375" for books with 24–150 pages, increasing to 0.5" for books with 151–300 pages, and further for thicker books. KDP’s trimming process can vary by up to 0.125", so keeping content safely away from the edge minimizes the risk of accidental cropping.
For books with bleed, the minimum outside margin increases to 0.375", compared to the 0.25" required for books without bleed.
How to Design Edge-to-Edge Illustrations
To create seamless edge-to-edge designs, your artwork must extend 0.125" beyond the final trim size on all outer edges (top, bottom, and sides). This ensures no unintentional white borders appear after the book is trimmed.
Before exporting your files, flatten any transparent layers to avoid printing issues. Also, make sure your PDF doesn’t include crop marks, trim marks, or registration bars, as these can interfere with KDP’s automated printing system. For coloring book lines and graphics, use a line thickness of at least 0.75 point or 0.01" (0.3 mm) to ensure they print clearly. Finally, review KDP’s file format guidelines to incorporate these steps smoothly into your workflow.
Uploading your coloring book to Amazon KDP Tutorial
File Formats, Color Profiles, and PDF Preparation
Once your images and layout are finalized, ensuring proper file formatting and PDF preparation is essential to meet KDP's requirements.
File Formats KDP Accepts
KDP supports several file types for manuscript uploads, including PDF, DOC, DOCX, RTF, HTML, and TXT. That said, if your coloring book includes images that extend to the edges (bleed), you’ll need to upload it as a PDF. For best results, convert your file to PDF/X-1a, which locks your layout and automatically flattens transparencies. Keep in mind that the maximum file size allowed is 650MB, so optimizing your file will help with both uploading and printing. Also, submit your interior pages as single pages, not two-page spreads.
Before moving forward, make sure your color settings and transparency adjustments align with KDP’s printing guidelines.
Color Profiles and Transparency Settings
Although KDP prints in CMYK, you should submit your files in RGB, as their system handles the color conversion. For black-and-white interiors, use pure black (C0 M0 Y0 K100) instead of rich black tones, which can print as a dark gray. Transparency must be flattened to avoid printing glitches, such as visible boxes or slight color shifts. Use design tools like Photoshop or Illustrator to flatten all layers and transparent objects before exporting to PDF. Additionally, KDP removes any embedded color profiles and spot colors (like Pantone), so make sure to exclude these from your files.
How to Prepare and Verify PDF Files
Once your file format and color settings are ready, follow these steps to prepare and verify your PDF:
- Preserve image quality: Disable downsampling and compression when exporting to maintain a resolution of 300 DPI. If you're using Microsoft Word, navigate to File > Options > Advanced > Image Size and Quality, and select "Do not compress images in file."
- Fully embed fonts: Ensure all fonts are fully embedded in your PDF, not just as subsets, to prevent character display errors during printing.
- Remove unnecessary elements: Delete printer marks, crop marks, registration bars, bookmarks, comments, and hidden objects, as these can interfere with KDP’s automated system.
After exporting your PDF, open it to confirm that all elements display correctly. If something looks off, go back to your original file, make the necessary changes, and export a new PDF instead of overwriting the old one - this helps prevent data corruption. Once uploaded to KDP, use their Online Previewer to check for issues like margin, bleed, and font errors. For added peace of mind, order a physical proof copy to ensure everything looks perfect before publishing.
sbb-itb-c02bfb4
Page Count and Interior Design Standards
Minimum and Maximum Page Count Rules
When publishing through KDP, your book must have at least 24 pages, and the total page count must always be an even number. For black ink on white paper, you can go up to 828 pages for standard sizes, while larger formats like 8.5" × 11" are limited to 590 pages. If you want text on the spine, your book needs to be at least 79 pages long.
Keep in mind, your manuscript can't have more than 4 consecutive blank pages in the middle or 10 consecutive blank pages at the end. Exceeding these limits could lead to your book failing manual review. Also, if you decide to use only right-hand pages for artwork, this will effectively double your file's page count. Once you've ensured your page count meets these requirements, the next step is crafting an interior layout that enhances usability and print quality.
Interior Design Layouts That Work
For coloring books, single-sided printing is the go-to choice. This means illustrations are placed only on the right-hand (odd-numbered) pages. This approach prevents ink or marker bleed-through from affecting the next design, and it also allows users to remove and frame their completed artwork. To cater to a range of skill levels, consider including a mix of designs: about 30% simple, 50% moderate, and 20% intricate.
To ensure high-quality prints, use pure black (#000000) lines with a minimum thickness of 0.75 point (0.01" or 0.3 mm). This prevents bleed-through and keeps the lines crisp. Avoid gradients or shading - stick to solid black lines on a white background for the best results. White paper is preferred in the industry because it enhances the vibrancy of colored pencils and markers, whereas cream paper can make colors appear muted. Successful coloring books typically contain 30 to 50 unique designs, striking a balance between offering value and avoiding overwhelming buyers.
Adding Extra Content Beyond Coloring Pages
To add value and meet page count requirements, think beyond just coloring pages. Include front matter like a title page or copyright notice, as well as back matter such as an "owner page" or bonus designs. These additional pages not only make your book feel more complete but also help you reach key milestones like the 79-page threshold. Reaching this milestone allows you to include spine text, which improves your book's visibility on shelves.
You can also use this extra space to promote your other work. For instance, add sample pages from your other books or include an author bio at the end to encourage repeat purchases. These small touches can make a big difference in how your book is perceived by buyers.
Tools and Workflow Recommendations
Design Tools and How to Set Them Up
Having the right tools can make a world of difference when creating a coloring book. Adobe Photoshop and InDesign are go-to options for professionals, offering robust features for both raster and vector designs. If you're looking for free alternatives, GIMP and Inkscape are solid choices. For those just starting out, Canva and even PowerPoint work well for assembling pages and covers, especially when paired with KDP templates.
When setting up your design tool, always configure your document to 8.5" × 11" at 300 DPI. For full-bleed designs, add 0.125" (3.2 mm) to the width and 0.25" (6.4 mm) to the height to account for trim areas. If you're using Photoshop, make sure to flatten your layers (Layer > Flatten Image) before exporting to avoid issues with transparency during printing. When saving as a PDF, double-check that fonts are fully embedded - not just subsets - so they display correctly on KDP's printing system.
To save time and effort, consider using batch processing tools to streamline your workflow.
Batch Processing for Faster Production
Batch processing is a game-changer when it comes to speeding up your production process. Instead of designing and exporting pages one at a time, you can create entire batches in one go. For instance, prepare a list of 30–50 themed prompts in a text file and integrate them into your workflow tool to generate multiple designs simultaneously. This approach ensures that key design elements, such as line thickness and detail consistency, remain uniform across all pages.
If you're using a workflow like Coloring Book Engine, batch processing can handle multiple pages at once, utilizing GPU-based local image generation to create high-resolution, print-ready PDFs. This method ensures you meet printing standards without incurring unexpected costs. For Canva users, you can set up a single page with the correct margins and use the "duplicate" feature to quickly create as many pages as you need.
How to Organize Files and Projects
Once your designs are complete, keeping your files organized is essential to avoid mistakes during the upload process. Start by finalizing your interior manuscript and determining the exact page count before designing the cover - this is critical since the spine width depends on the total number of pages.
Create clearly labeled folders for each stage of your project. For example, maintain separate folders for your editable source files (from Canva, Photoshop, or Word), your high-resolution image assets, and your final print-ready PDF. Use numeric prefixes, like "01_lion.png", to keep your pages in order.
Every time you make changes, update your source file and export a new PDF to avoid data corruption. Before the final export, use tools like Select All (CTRL+A) or enable formatting marks (look for the "¶" symbol) to catch hidden characters or empty text boxes that could cause margin errors. Finally, double-check that you've removed any placeholder text, crop marks, and printer's marks before generating your final PDF for upload.
Pre-Upload Checklist and Final Verification
Once you've worked through the detailed specifications, this checklist serves as a guide to ensure your file is fully prepped for a smooth upload to KDP.
Required Pre-Upload Checks
Before hitting that upload button, confirm these technical aspects are in order:
- File format: Use PDF for both the manuscript (especially if it includes bleed) and the cover.
- Image resolution: All images should have a resolution of at least 300 DPI.
- Document dimensions: Double-check that your document matches the selected trim size.
- Bleed settings: Ensure bleed dimensions are accurate. Covers need a 0.125" bleed on all outer edges.
- Fonts and layers: Make sure fonts are fully embedded and all layers are flattened.
- Line thickness: Any line art should have a minimum thickness of 0.75 points (0.01" or 0.3 mm).
- Safe margins: Keep critical content at least 0.25" (6.4 mm) from the trim edges.
- File cleanup: Remove crop marks, trim marks, comments, and placeholder text in your PDF export settings.
- File size: Confirm that your file size is under the 650MB limit.
Once you've verified these details, test your book using the KDP Previewer to catch any issues before moving forward.
Using the KDP Previewer to Test Your Book
After uploading your files, start with KDP's online previewer. This tool helps you spot common issues like margin or bleed errors. If you notice any problems, revise your source file and re-upload it until everything looks just right.
Ordering a Physical Proof Copy
While the digital preview is helpful, it can't replace the accuracy of a physical proof copy. Ordering a physical proof lets you see your book exactly as your readers will. Colors displayed on a screen (RGB) often differ from printed results (CMYK), so this step helps you evaluate color consistency, print quality, and the overall feel of your book.
When your proof arrives, take a close look at these areas:
- Spine alignment: KDP allows for a production variance of up to 0.125" (3.2 mm) for trimming and spine shifts. Make sure your design accounts for this.
- Bleed and borders: Check for white borders at the edges, which could mean your bleed settings are off.
- Text placement: Ensure no text wraps onto the spine or gets trimmed off.
- Image quality: Look for any pixelation or blurriness in your images.
- Transparency issues: Areas with transparent images may show slight color variations if not flattened properly.
"For the best results, all images should be sized at 100%, flattened to one layer, and inserted into your manuscript file at a minimum resolution of 300 DPI (dots per inch)." – Amazon KDP
This physical proof is your final check before publication. By following these steps, you'll ensure your coloring book meets all of KDP's technical requirements, paving the way for a smoother printing process and a polished finished product.
Conclusion: Key Points for KDP Coloring Book Success
To create a standout coloring book on KDP, meeting the technical requirements is non-negotiable. Start with images that are at least 300 DPI to ensure crisp, high-quality prints that don't suffer from pixelation. For designs that reach the edges of the page, include a 0.125" (3.2 mm) bleed to prevent unwanted white borders after trimming.
When submitting your files, use PDFs with flattened layers and embedded fonts to avoid printing errors. Keep all critical elements within safe margins, and ensure your line thickness is no less than 0.75 point for clear, sharp lines. These steps are crucial for maintaining quality and consistency in the final product.
Always order a physical proof copy before publishing. Digital previews can't fully capture how colors will print, whether the bleed is accurate, or if lines are as sharp as intended. Keep in mind that KDP allows for a production variance of up to 0.125" (3.2 mm) during trimming, which could slightly impact borders and spine alignment.
FAQs
What are the standard trim sizes for KDP coloring books?
The most common trim sizes for KDP coloring books are 8.5" × 11", 8" × 10", 8.5" × 8.5", 7" × 10", and 8" × 8". These dimensions strike a balance between being visually appealing and easy to manage, making them suitable for various audiences.
When deciding on a trim size, think about who your audience is and what type of designs you’re offering. For instance, 8.5" × 11" is perfect for larger, intricate illustrations, while square options like 8.5" × 8.5" are ideal for compact, modern layouts.
How do I make sure my images meet KDP's 300 DPI requirement?
To meet Amazon KDP's 300 DPI requirement for images, start by setting your design software's resolution to 300 DPI before you begin creating content. For an 8.5" × 11" page, your canvas dimensions should be 2550 × 3300 pixels to maintain the necessary resolution.
When you're ready to export, save your files in a format approved by KDP, such as PDF (Print-Ready) or high-quality JPEG/TIFF. Make sure to double-check the resolution settings during export to confirm they remain at 300 DPI. Avoid simply resizing low-resolution images, as this can degrade their quality. To confirm everything is correct, open the exported file in an image editor and check the resolution under the image properties - it should clearly show 300 DPI.
By setting the right dimensions, exporting in the proper format, and verifying your resolution, you can confidently ensure your coloring book meets KDP’s print standards.
Why should I order a physical proof of my coloring book before publishing on KDP?
Ordering a physical proof of your coloring book is a crucial step to ensure the final printed version matches your vision. A physical copy lets you spot potential issues like formatting errors, low image resolution, or unexpected color and contrast problems - things that might not be apparent in a digital preview.
By holding the actual book in your hands, you can identify and correct any mistakes before it becomes available for purchase. This step is particularly important for coloring books since elements like page alignment and paper quality play a big role in creating a satisfying experience for your audience.